This is not meant to be a definitive guide to multicast. There are more detailed documents and white papers from Cisco and others on this subject. This is just an attempt to give a basic understanding and encourage you to learn more about this subject.
This is a two-part blog. The 1st blog named “Settings that can improve Multicast on a Wireless Network” which discussed the settings needed to optimize a Wireless/Wired network for multicast traffic. This blog will discuss more about settings and troubleshooting on a Cisco Controller based wireless network.
I work for a wireless communications vendor that uses multicasts as an integral part of the product. I have been onsite and on conference calls with customers trying to troubleshoot multicast issues. The issue almost always turns out that multicast packets are being blocked somewhere on the network. There seems to be a lot of confusion about what happens to multicast packets and how to prevent them from being blocked on your network. This blog will try to explain the paths the multicast packets take on the wireless and wired network.
The topics I will cover in this blog are multicast packets on a controller-based network, configuring multicast on a Cisco Controller, IGMP snooping on the controller, troubleshooting multicast issues, troubleshooting using Multicast Hammer, Cisco commands and some links to blogs and articles I found helpful.
Background
The Cisco network uses IGMP (Internet Group Messaging Protocol) to manage the multicast traffic. When a multicast session is started a client or server will send an IGMP join message to a certain multicast address. Any clients that want to be part of this group will send a join message to the same multicast address. These join messages will get recorded on your local network’s router as well as the Rendezvous point (RP). If your local router sees traffic for this multicast address it will pass the traffic to your local network. If the router sees multicast for a different address it will dump these packets. When IGMP snooping is enabled on the switch, it will record which ports need multicast traffic.
Terms discussed in this blog
Multicast Group ID (MGID) is created by the controller and passed to each AP. The MGID is the ID number which maps multicast source, the multicast address and the VLAN. This helps the controller and APs to keep track of multicast groups.
Delivery Traffic Indication Map (DTIM) is an informational element in a beacon that will inform a station if there is any multicast traffic the AP has for the station.
Rendezvous Point (RP) is a router in a multicast network domain that acts as a shared multicast tree. There can be multiple RP on any given network.
Configuring Multicast on Cisco Controller
There are two modes you can use on your controller; Multicast-Unicast and Multicast-Multicast. If you use Multicast-Unicast, then the controllers will make a copy of every multicast packet and sends these packets out as unicast packets to every AP. This would work OK for a smaller network but in a larger network, this would create too much traffic. In larger networks Multicast-Multicast mode is much more efficient use of bandwidth.
When selecting the Multicast-Multicast option on the controller you will need to choose a multicast address. This address must be different on every controller on your network.

Screenshot courtesy of mrn-cciew
When an AP connects to a controller, the controller will tell the AP to join this multicast address you have chosen. All the APs will send a join message to this multicast address. When the controller receives a multicast packet it sends out one packet and all the APs who have joined the multicast group will receive this packet. Multicast can be best described as one to many, where unicast is described as one to one.
IGMP snooping on the Controller
When IGMP snooping is enabled on the controller, it creates a Multicast Group ID (MGID) table, which keeps track of the clients and what multicast groups they have joined. The controller sends this MGID table to all the APs that are connected to it. When multicast packets are sent to the APs, the APs will check the MGID table to see if they have any clients that have joined this multicast session. If they have a client, the AP will send the traffic. If the AP doesn’t have a client, the AP will discard the traffic.
If IGMP snooping isn’t enabled on your controller all APs that have the same VLAN where the multicast traffic had been requested (even by a client on another AP), will receive these multicast packets and will send them out. This means every AP will be sending out multicast packets even if they do not have a client for this traffic. IGMP snooping will limit the multicast packets that are sent by the APs.
Multicast Packets on a Controller based network
When the wireless client sends an IGMP join message to the AP, the AP sends this join message through the CAPWAP tunnel to the controller. The controller absorbs this join message and sends a new join message to the local router on the VLAN of the client using its own IP address (not the IP address of the client). The router then adds this multicast group to the interface creating a (*,G) entry.
When multicast packets are sent from the wired side of the network, the router which is acting as Rendezvous Point (RP) will send these packets to the controller. The controller receives these packets and encapsulates them in its multicast address. The controller then sends these multicast packets to all the APs on that controller. The AP strips the controller’s multicast address and sees the original multicast address. The AP checks its MGID table to see if it has a client for this multicast address. If the AP has no clients that have subscribed to the multicast, then the AP drops the packets. If the AP has clients that have subscribed to the multicast address, then the AP sets the AID of that client in the DTIM section of the beacon. The AP then sends the packets down to the client immediately after the beacon. The AP cannot hold multicast packets longer than the DTIM value, the AP sends these packets even if the client is sleeping. This is different from unicast packets where the AP will hold onto them until the client requests the packets.
When multicast packets are sent from a wireless client, the wireless client sends the packets to the AP as unicast packets to the multicast address. The AP then sends these unicast packets through the CAPWAP tunnel to the controller. The controller then makes two copies. One copy is sent out to the locally connected LAN where the router will forward these packets to the RP. The second copy the controller encapsulates in its multicast address and sends these multicast packets to all the APs on that controller. The AP strips the controller multicast address and sees the original multicast address. The AP checks its MGID table to see if it has a client for this multicast address If the AP has no clients that have subscribed to the multicast then the AP drops the packets. If the AP has clients that have subscribed to the Multicast address, then the AP sets the AID of that client in the DTIM section of the beacon. The AP then sends the packets down to the client immediately after the beacon.
Troubleshooting Multicast issues
When troubleshooting multicast issues there are many settings you should look for in the Wireless controller and on your switches and routers. These settings are discussed in greater detail in my blog “Settings that can improve Multicast on Wireless Networks” which can be found here.
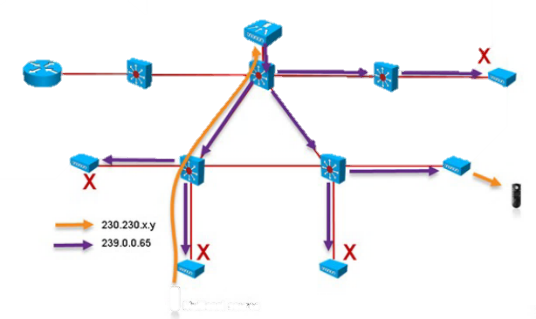
Most multicast issues are caused by not having PIM set up correctly on your network. Two ways you can troubleshoot this are; 1) check all the VLANs where the multicast traffic will traverse or 2.) check to see if the join messages are being recorded on your router and switches (if you have snooping enabled).
Protocol-Independent Multicast (PIM) needs to be enabled or set on all your VLANs where multicast traffic will traverse. The VLANs you need to enable it on are the management VLAN, AP management VLAN (if different from the management VLAN), AP VLAN, the VLAN of the sending device and the VLAN of the receiving device. The management VLANs are very important since the controller sends multicast packets to the APs using either the management VLAN, AP management VLAN or the AP VLAN. These VLANs are often overlooked. Checking all the interfaces and VLANs where traffic will traverse always seems to cause Network Admin the most trouble. They usually ask me to list out all the interfaces where PIM needs to be enabled. This is difficult for them but impossible for an outsider with no direct knowledge or access to their network. We always recommend opening a case with Cisco (or your wireless vendor) to help find all the VLANs and interfaces where the multicast traffic may traverse.
If you need to verify that join messages are making it through your network, you will need to SSH to all routers and switches in the path and make sure you see the join messages from the clients. If you get to a router or switch where you no longer see join messages, you probably have found the issue.
Another common issue is multicast packets getting stuck at the core. If the multicast packets are flowing over the core, make sure the VLAN the EtherChannel/Port Channel have PIM enabled on them. I have seen issues where one EtherChannel had PIM enabled the other EtherChannel did not. This caused one multicast session to work and the next multicast session to fail.
After checking the VLANS for PIM and checking to see if the messages are traversing your network you should check other settings including DTIM, TKIP, RP, IGMP snooping, multicast buffering and roaming.
DTIM should be set to 1 especially if you are using multicast for voice. You can check this either on the GUI of the controller, in the controller config file or a wireless capture. The DTIM will be in the beacons of the wireless capture under the Traffic Indication Map. If DTIM count is set to 0 then you are seeing a DTIM beacon if the DTIM period is set to 1 then the next beacon will also be a DTIM beacon (see below).

We all know TKIP has been deprecated but you may still have it lingering on your network, if you have TKIP and AES on the same SSID this will cause issues with multicast. You can check this either on the GUI of the controller, the controller config file or you can look at the beacons in a wireless capture. The capture below shows AES in the Pairwise Cipher suite list. If TKIP was enabled, you would see it in the same section.

Multiple Rendezvous Points (RP) can cause issues with multicast if you have devices on multiple VLANs and each VLAN is directing you to different RPs. This will cause your devices on one VLAN to get the multicast traffic and the other devices on a different VLAN will never get the multicast traffic. If you have two RPs, they must communicate and update each other or better yet have one RP for the entire network.
If you are having issue with delivery of multicast packets you should verify you have IGMP snooping set on your switches. To verify if IGMP snooping is enabled on the switch run the command show ip igmp snooping
If it is not enabled on the switch you should set it globally, then you can set it per VLAN. Enabling it globally, run the command ip igmp snooping enable to enable it on a VLAN 2 you would use the command ip igmp snooping vlan 2 enable
If you have higher DTIM values (which causes the AP to hold on to multicast traffic for longer periods of time) and your network experiences a high volume of multicast traffic, you may experience issues where some multicast packets are being dropped. This may be caused by your multicast buffers being over-run. Each radio can handle 50 Multicast packets at any given time. These are shared equally across all SSIDs. You can verify the Multicast buffers by running the command show controller dot11radio0 | begin –\ In-Prog . You can enable a WLAN to use more than 50 using the command config wlan multicast buffer enable (30-60) <wlan-id> Increasing the Multicast buffer size will allow the AP to hold on to more multicast packets.
Roaming can cause issues with multicast especially if your client doesn’t send a new join message after each roam. This issue is more common with Autonomous APs or even cloud based AP. Cisco controllers will prompt the client to send a join request or they will send a new join message on behalf of the client after a roam. In Autonomous APs or even cloud based APs if a new join message is not sent and you have igmp snooping enabled on your switches the multicast packets might get delivered to the wrong AP.
.
Troubleshooting using Multicast Hammer
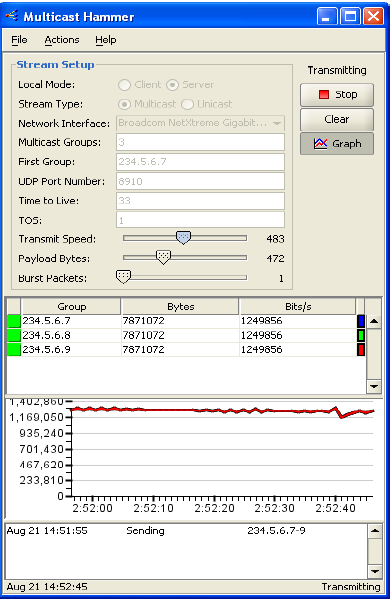
Multicast Hammer is a free tool that can help you troubleshoot multicast issues. You can download Multicast Hammer installer and setup instructions from the internet. It is a simple program to use and install that was created by Nortel (maybe the only thing left of Nortel in use these days). Multicast Hammer simulates multicast traffic on your network. It is a valuable tool that will remove questions about certain applications and show you raw multicast traffic (or lack of it) on your network. You should run MC Hammer on two machines that are on the same WLAN. Set one up as a server and one as a client. Run the test to see if data is flowing between machines. Once you see data you should move one of the machines to another network and retest. This will help you find out where multicast traffic is being blocked.
I won’t go through the install of Multicast Hammer (or as Vocera has dubbed it MC Hammer….can’t touch this!!!!) but I wanted to show you two screen shots one set up as server and one and client.
Server
The set-up is rather simple. You want to make sure you have the server radio button selected, choose your network interface, and then choose an available Multicast address (not the MC address on your controller). After you hit start on the server and client you will see data flowing. If you only see the data on the server then you know multicast traffic is being blocked somewhere on your network.
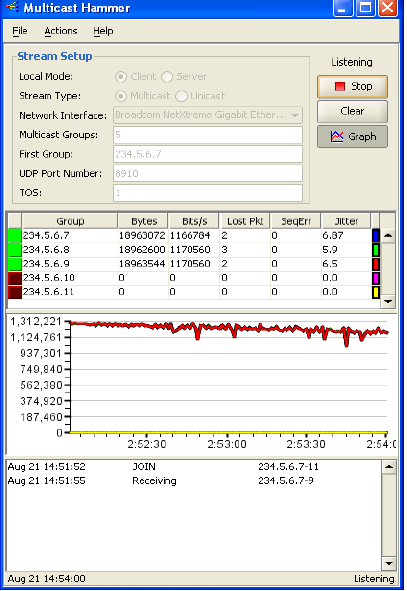
Client Side
The set-up is rather simple. You want to make sure you have the Client radio button selected, choose your network interface and then choose the same Multicast address as you chose in the server side of the application. After you hit start on the server and client you will see data flowing. If you only see the data on the server then you know multicast traffic is being blocked somewhere on your network.
Cisco Multicast Troubleshooting commands
show ip pim interface
show ip mroute
show ip igmp
Debug bcast * enable
Debug ip igmp
show ip igmp groups
On the controller verify multicast mode
show network
On the controller check L2 and L3 MGIDs
show network multicast mgid summary
show network multicast mgid detail <mgid>
Links to Multicast articles, videos and blogs
https://www.youtube.com/watch?v=Gjt2L9jAYNA From Kevin Wallace Cisco Multicast Routing for CCNA, CCNP, and CCIE candidates
https://www.cisco.com/c/en/us/td/docs/wireless/controller/technotes/7-4/vocera_config_guide/vocera_config_guide/vocera_config_guide_chapter_01011.pdf Cisco guide on how to configure multicast for Vocera
https://supportforums.cisco.com/document/56511/multicast-and-wireless-lan-controller-wlc This is from Stephen Rodriquez 7 years ago but still good info in there.
http://www.cisco.com/c/en/us/td/docs/switches/datacenter/nexus1000/sw/4_0/troubleshooting/configuration/guide/n1000v_troubleshooting/trouble_14mcast.html
https://community.cisco.com/t5/wireless-mobility-documents/understanding-multicast-in-unified-wireless-networks/ta-p/3125021 This a power point Understanding Multicast in Unified Wireless Networks by Jeff Keown Cisco Wireless TAC
http://www.labminutes.com/wl0025_wlc_multicast_videostream_1 excellent video on setting up your controller for multicast.
https://mrncciew.com/2012/11/17/configuring-multicast-on-wlc/ everything on mrc-cciew site is awesome and I learn a ton every time I visit
Thank you for reading this blog. I hope reading this blog gives you more insight into multicast on a Cisco network. Please leave comments and continue this discussion on Twitter and Slack. If you haven’t followed me on Twitter please use this link to follow me @wifi_nc
